

Where Are Defined Patterns Saved In Photoshop
What Are Photoshop Patterns?
A pattern in Photoshop is essentially an paradigm that can be tiled repeatedly. The use of patterns tin speed up your workflow by cutting out the need to create intricate objects that can otherwise be constructed using a repeatable image template.
Not merely will they salve yous time, but they can marry intriguing blueprint elements to your work. You can make your ain custom patterns, use preset patterns that come with Photoshop, or download and install pattern libraries from various sites like deviantART. In this guide, we will talk well-nigh:
- Exploring preset patterns with the Preset Director
- Applying Photoshop patterns using three different methods
- How to create a custom Photoshop pattern of your own
- Creating and applying a diagonal line pattern (for practice)
- Installing a Photoshop design library
- Creating a blueprint library
- Case tutorials that employ patterns
Exploring Preset Patterns with the Preset Manager
You can locate patterns that come with Photoshop (besides as any of your previously saved patterns) with the Preset Manager. You can admission the Preset Director by going to Edit > Preset Manager. By default, the Preset Manager displays preset brushes.
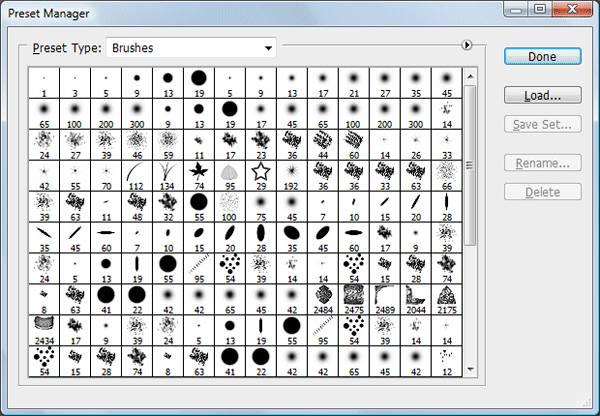 In the Preset Managing director window, at the Preset Blazon dropdown menu, choose Patterns to filter your Photoshop presets to simply patterns.
  You might not run into a lot of patterns at first; if this is the instance, you will have to load the blueprint libraries that come with Photoshop. A pattern library is a collection of i or more patterns; it has a file proper name extension of .PAT.
You can find pattern libraries from Adobe'due south Photoshop Exchange, Brusheezy, and many other places. To load pattern libraries that come up bundled with Photoshop, click on the triangle at the right, which will show you a menu of preset patterns. 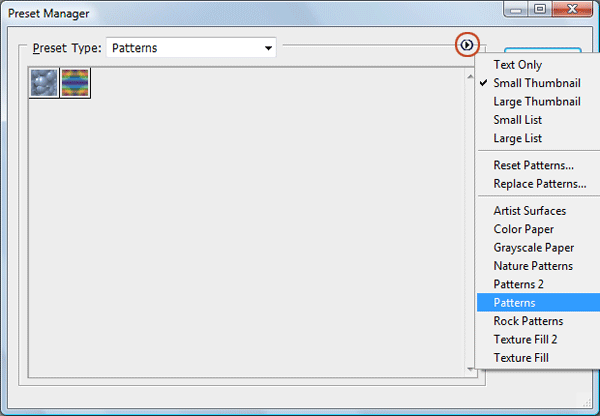 Choose one of the options to load (such equally Patterns, Patterns 2, or Stone Patterns).
When you select a blueprint to load, you will be asked whether or non you desire to replace the electric current patterns. 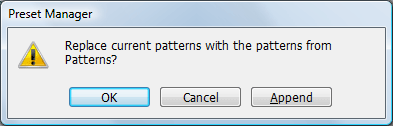 Just choose Append, which will add the set of patterns to your electric current listing instead of replacing them.
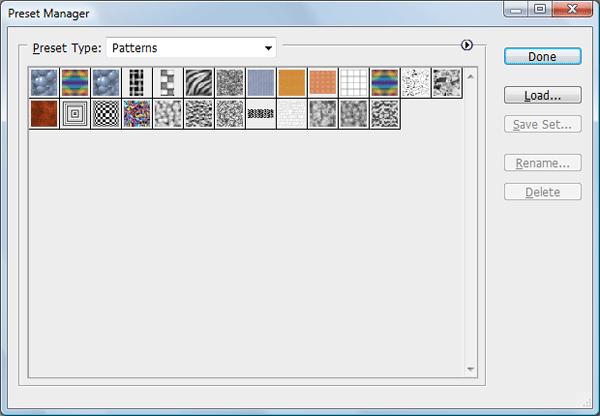
Applying Photoshop Patterns
With your preset pattern libraries loaded, it's time to encounter how to apply them. In that location are several methods you can apply to apply a design, and we'll go over each ane.
Fill up Command: Filling Selections with Patterns
The simplest fashion to use a pattern is past selecting the area you desire to make full with your pattern and and so using the Fill command to apply it. For example, you can employ the Rectangular Marquee Tool (K) to create a selection somewhere on your canvas, become to Edit > Fill (Shift + F5) to access the Fill dialog window, and then at the Use choice, choose Pattern. 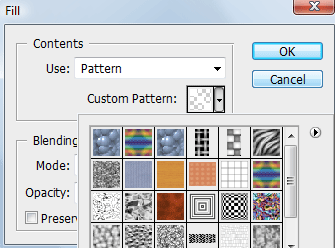 Picking the Blueprint option as the Use choice will enable a new option in the Fill dialog window chosen Custom Pattern.
Set the Custom Pattern option to your desired pattern and then press OK to fill your choice with that pattern. The Fill command is an easy method for applying a pattern onto the entire canvas or in parts of it. Some other advantage of the Fill up command is that y'all tin can accept your pattern in a separate layer, which means that you tin make changes to that layer without affecting other layers.
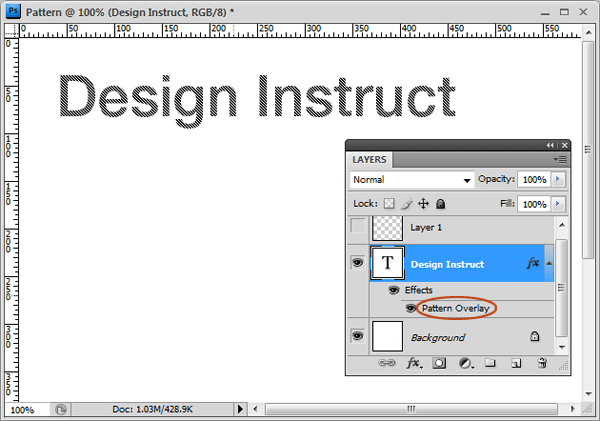
Design Overlay: Styling a Layer with Patterns
If you have a layer that you'd like to apply a pattern on, yous can employ the Pattern Overlay layer effect to style that layer. Double-click on the layer to open the Layer Styles dialog window. Click on Pattern Overlay on the right.
Under the Blueprint option, find a blueprint you'd similar to employ. 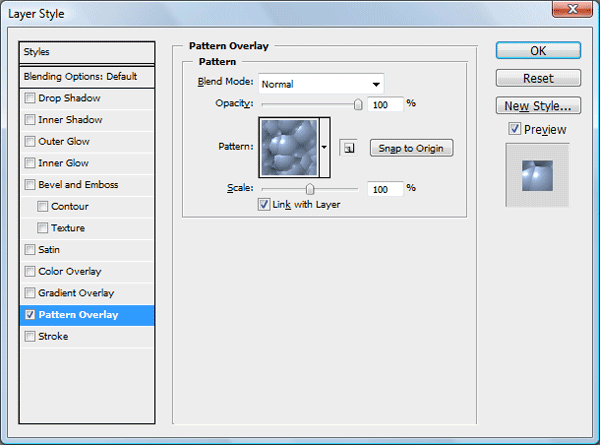 This method is for when you demand more flexibility: You tin easily hide, show, delete and tweak a layer effect without affecting the contents of that layer. Tip: To adjust the position of your pattern overlay, check the Preview option, and in your canvas, hover over the area with the pattern overlay, click-and-hold, and then drag your mouse around.
Painting Tool: Painting with Patterns
If y'all would like to pigment a pattern onto the canvas, there are several painting tools such as the Paint Bucket Tool and the Pattern Postage Tool that can be set to use patterns. 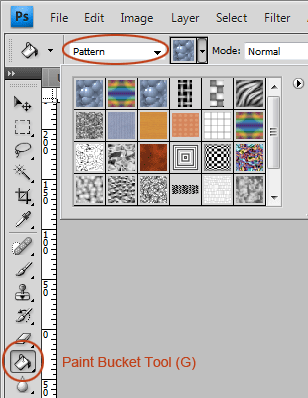 Using a painting tool is beneficial when you lot desire to apply a pattern irregularly. Painting tools besides requite you more control, which specially shows off its merit when you accept a graphics tablet.
However, it will take more than time to apply a pattern using painting tools when compared to using a Pattern Overlay layer consequence or the Fill up command because they automatically make up one's mind how to employ the pattern. Furthermore, the results can be irregular and unpredictable when using the Pattern Stamp Tool (which isn't necessarily a bad thing depending on what y'all're trying to do).
Summary Table: Applying Photoshop Patterns
| Application Method | Reward | Disadvantage |
| Fill control |
|
|
| Design Overlay layer outcome |
|
|
| Painting tools |
|
|
Create a Custom Photoshop Pattern
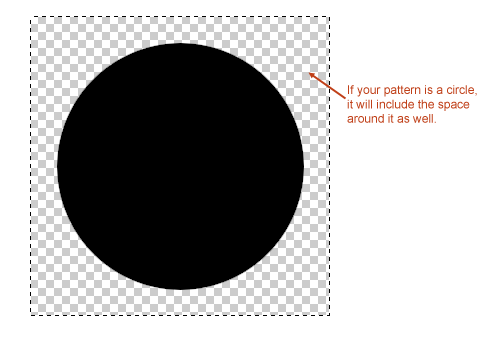
Making your own patterns is a straightforward affair. Go along in mind that patterns must be rectangles; information technology tin't be odd shapes. If it'southward an shape that doesn't have rectangular sides (similar a circumvolve), the pattern volition be treated similar a rectangle.
 To create a blueprint, use the Rectangular Marquee Tool (M) to place a selection around the area you want to make into a pattern. Afterwards, define the selected area as a pattern by going to Edit > Define Blueprint.
  Tip: Many find it easier to create patterns outside of their working document in another Photoshop document.
If you want to create a pattern that isn't from any part of your working document, this is a skillful option because it allows you lot to focus only on designing your blueprint.
In Practice: Creating and Applying a Diagonal Line Blueprint
Allow's practice how to create and apply Photoshop patterns. We volition create one of my favorite patterns: a diagonal line design, which y'all tin can see utilized all throughout Design Instruct. 
Create the Working Certificate
Get-go, create a new document (Ctrl/Cmd + N) in Photoshop. This will be our primary document. 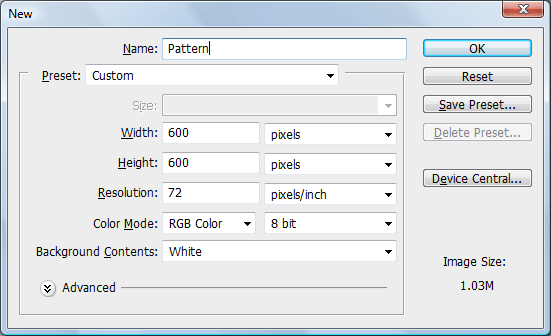 Use the Horizontal Text Tool (T) to write some text in your new document.
Since the pattern we will exist making is white, cull a dark text colour (similar black) so we can run into our patterns conspicuously. In this example, Helvetica Neue Medium at 30pt was used (Arial — or whatever font, really — will work). 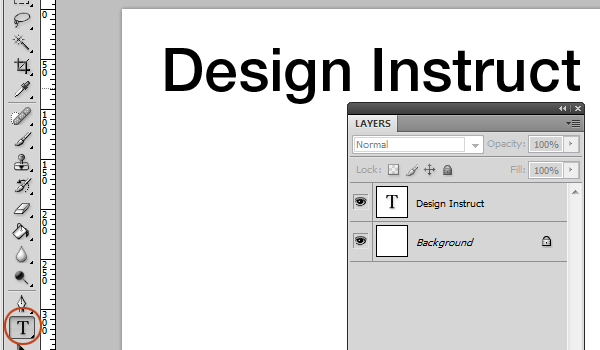
Create the Diagonal Line Pattern
We will create the pattern in some other document. Make another document that's 3x3px in dimension. In the Groundwork Contents option, choose Transparent and then that, correct off the bat, nosotros won't take the default white Background layer.
 The canvas will be pretty minor — it's but 3x3px — so we will need to zoom in really close. Employ the Zoom Tool (Z) to zoom in so that you can easily come across your work. I zoomed in to 3200% of the original size (which is the maximum zoom).
 Draw a white diagonal line from the top-left corner to the lesser-right corner of the canvass. In that location are several ways to practice this. My mode is using the Pencil Tool (B).
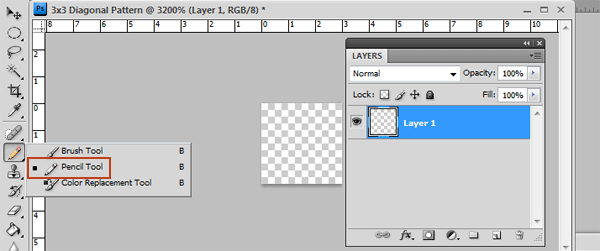 Gear up the Foreground color to white (#ffffff) then prepare the Pencil Tool via the Options Bar by choosing the Hard Round ane pixel. Cheque that your Flow and Opacity is at 100% (it should be by default).
 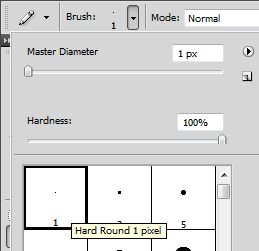 I've switched to a unlike colour simply for analogy purposes so that you may see the following procedure conspicuously.
Agree down Shift (which will ensure that we make a straight line), click one time at the top-left corner, and and so click once more on the bottom-right corner of the canvas. 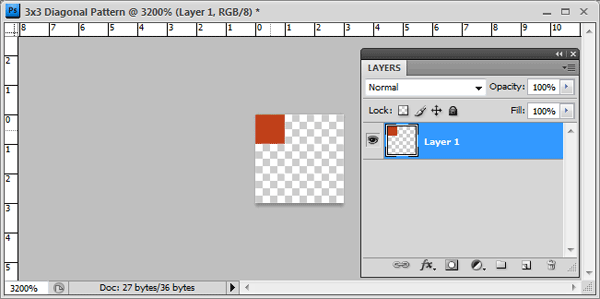
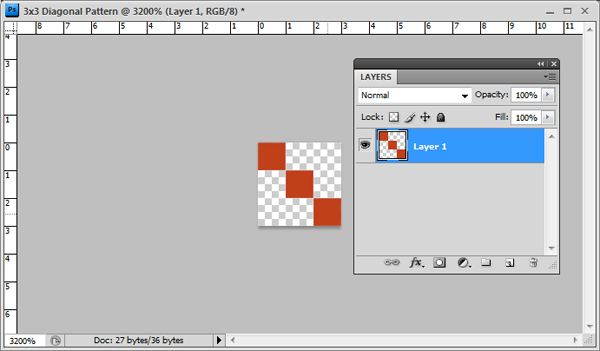 Here's our white diagonal pattern now (I've switched back to the original white colour):
 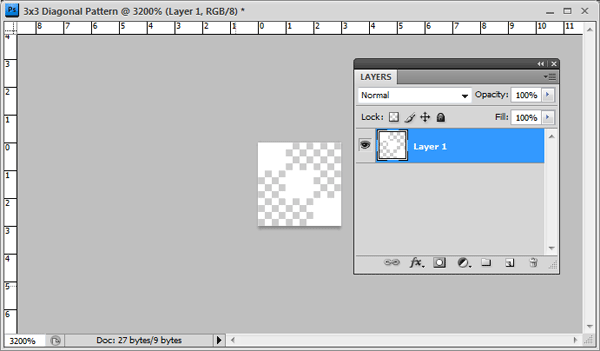 One time the diagonal line has been drawn, cull Select > All (Ctrl/Cmd + A) to put a choice around the canvas.
 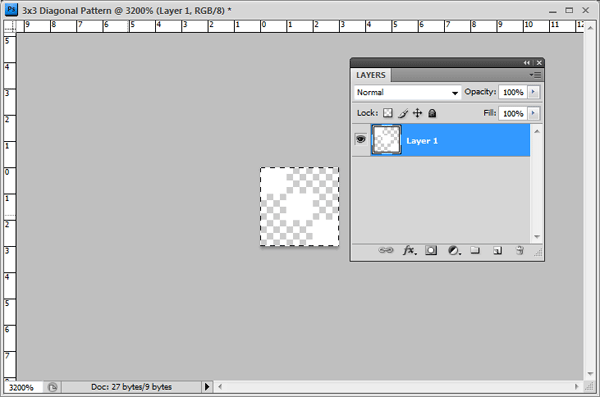 With the entire 3x3px canvass selected, ascertain the pattern by going to Edit > Define Pattern.
What you will see next is the Blueprint Name dialog window. Just name your pattern something that you will call up; I named my pattern every bit 3×three diagonal line. 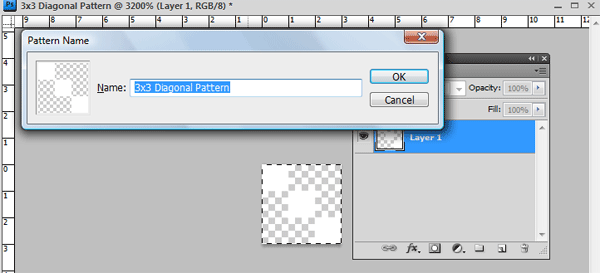 You may at present close this document (you don't need to salvage it).
Switch back to the original Photoshop document. Next up, we will utilize our custom design using the 3 different methods we've discussed.
Apply the Custom Pattern Using the Fill Command
First, create a new layer above the text layer. And then create a choice around the text by holding down Ctrl/Cmd and so clicking on its layer. 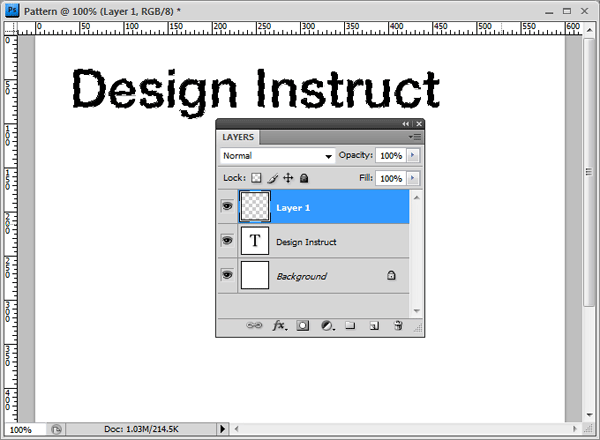 Press Shift + F5 (or choose Edit > Fill).
Under Use, selection Pattern and under Custom Pattern, locate the diagonal line blueprint nosotros but created. 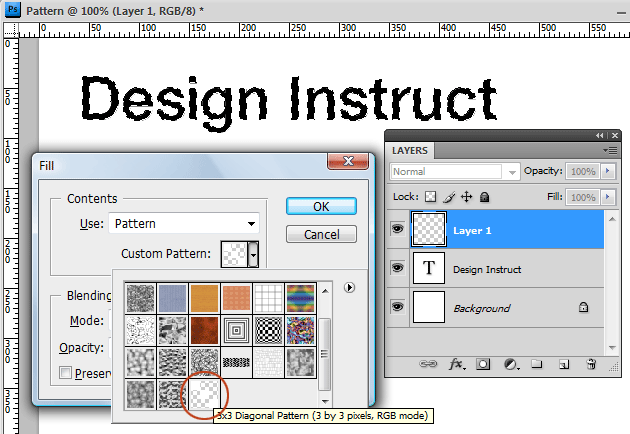 Press OK to use the blueprint using the Fill command.
 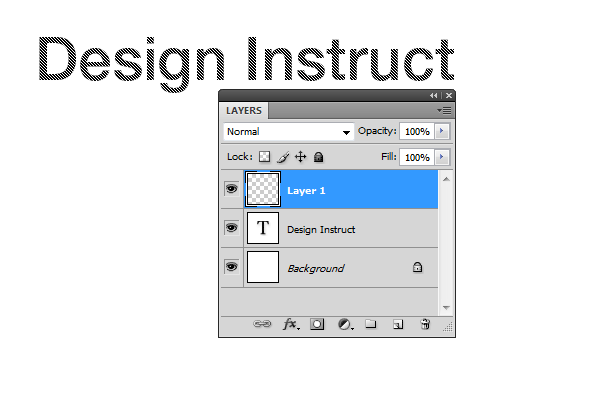 What's great about this technique is that you can adapt the blend fashion and layer style of the pattern's layer without affecting the text layer beneath it.
Allow's do that now. Let's reduce the Opacity of the layer to around fourscore% so that information technology's not so potent. 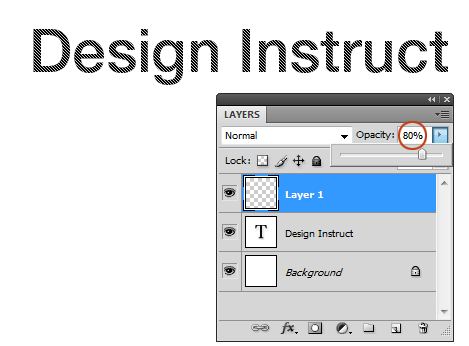 Tip: A good do to follow when using patterns on a separate layer is to link the two layers together.
That way, if y'all choose to motility the text layer, the pattern layer will movement with information technology (and vice versa). Practise this past selecting both layers in the Layers Panel, right-clicking on ane of them, so picking Link Layers.
Apply the Custom Pattern as a Design Overlay
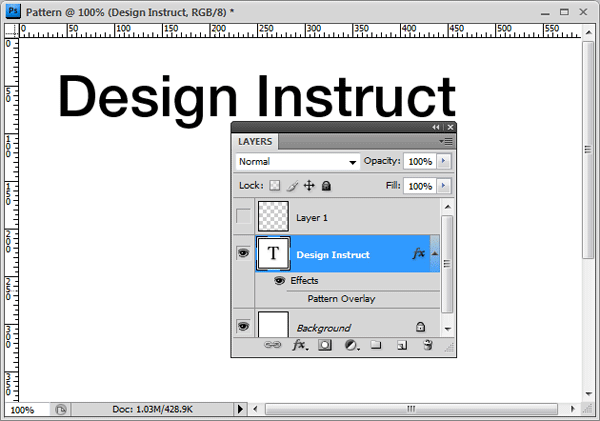
Allow us at present reapply the aforementioned blueprint, but this fourth dimension, using a layer style. Hide or delete the design layer fabricated past the Fill command. 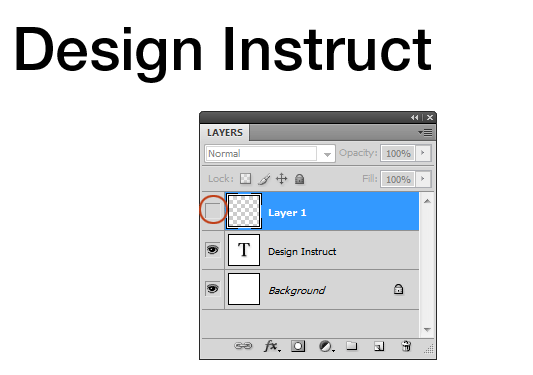 Double-click on the text layer to come across the Layer Way dialog window.
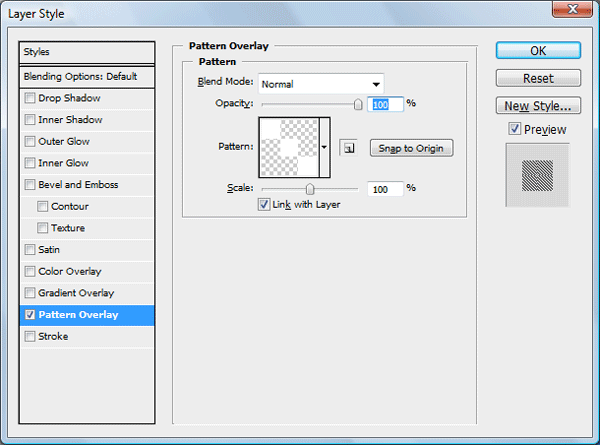
Click on Blueprint Overlay on the left to use this layer effect and to see the Pattern Overlay options. In the Pattern option (it's a dropdown menu), find the 3×iii diagonal line pattern we fabricated. Make certain that you lot've checked the Preview selection on the correct of the dialog window and then that you can meet how the text layer is being styled equally yous style it.
 Yous can larn more nearly the Pattern Overlay layer style options via our Photoshop layer styles guide, only in cursory, hither are the options.
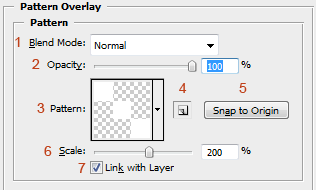
1. Blend Mode
Changes the alloy mode (e.g. Darken, Multiply, Color Burn) of the pattern.
2. Opacity
Controls the opacity of the blueprint. Lower the value to brand the pattern semi-transparent. 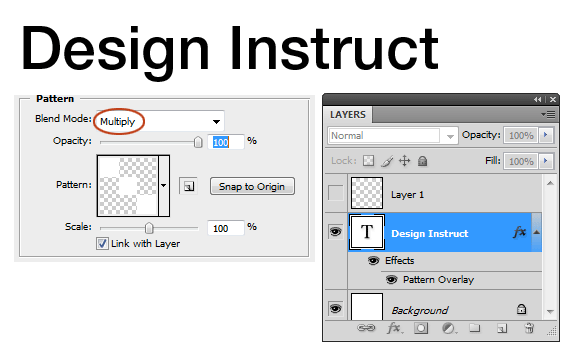
iii. Design (Dropdown menu)
The pattern to apply. 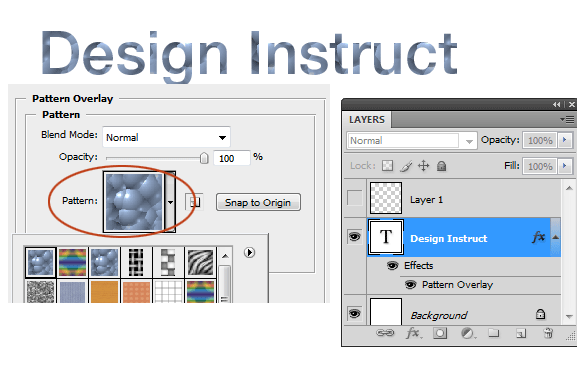
4. Create a new preset from this pattern
Click this icon if you want the pattern you've applied saved as another blueprint (saving it this way also retains all other option tweaks you've made).
five. Snap to Origin
If you motility the pattern around while applying the layer effect, printing this selection to reset its position.
6. Scale
Adjusts the size and resolution of the blueprint. 
7. Link with Layer
If this option is checked, the design will motion along with the layer if you motion it. This option is selected by default. Uncheck it if you don't want to pattern to movement when the objects in the layer it is on is moved afterward y'all take applied the effect.
Apply a Custom Pattern Using Pattern Stamp Tool
Side by side, we're going to apply our custom diagonal line pattern using the Pattern Stamp Tool (Due south). There are other painting tools that you can use patterns with, merely this particular tool is specifically for the application of patterns. Recollect of this painting tool as if it'south the Brush Tool (B), but instead of brushes, you paint with patterns.
First, hide (or delete) the Design Overlay layer effect and so that we can see our blueprint applied using the Pattern Postage stamp Tool. Hide the Pattern Overlay past clicking on the eye icon in the Layers Panel side by side to Design Overlay. 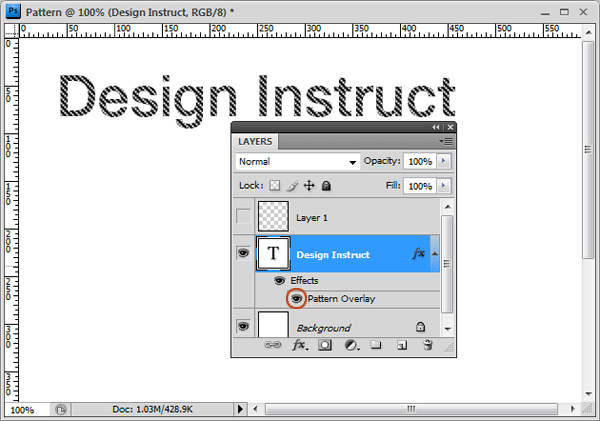
 Now select the Design Stamp Tool (S) from the Tools Panel.
 In the Options Bar, click on the Design picker dropdown menu and search for our 3x3px diagonal line pattern. Click on our diagonal pattern to set information technology as the Pattern Stamp Tool's brush tip.
 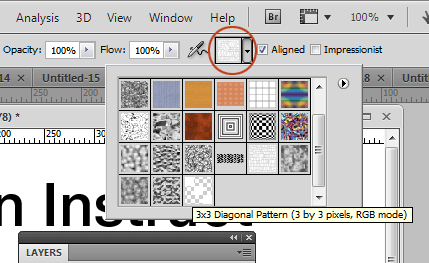 Create a new layer and pigment on our text to apply the blueprint.
Below, you can come across that I just clicked on a few places and played effectually with the Design Stamp Tool's Opacity and Flow options to get organic and unique effects. Unlike the Fill control and the Pattern Overlay layer event, it will be harder to replicate this look twice. 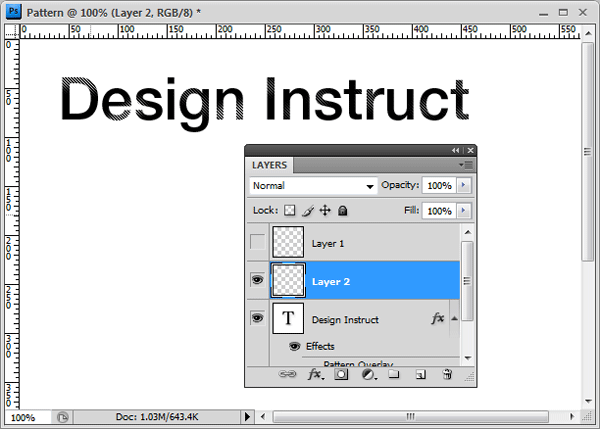
Installing a Photoshop Pattern Library
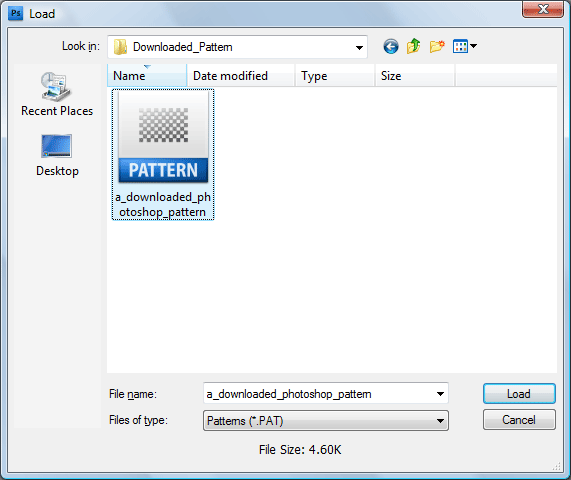
If y'all have downloaded a Photoshop pattern library, installing information technology is a snap. Go to Edit > Preset Manager. Press the Load button on the right.
Locate your Photoshop design file in your figurer (it should accept a file extension of .PAT). 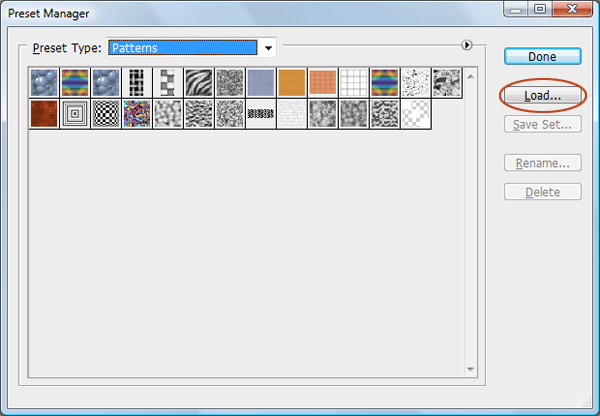
 For Photoshop CS versions, you tin can notice the design library presets in the folder location:
 Adobe Photoshop [Photoshop Version] > Presets > Patterns.
Where to Download Photoshop Blueprint Libraries
You might exist wondering where you can download Photoshop pattern libraries to install. Here are but a few recommended places to check out.
- Adobe – Photoshop Exchange Patterns: The official Adobe marketplace has a section on pattern libraries. There are over 75 blueprint libraries featured in the site at the moment, with many being costless for download.
- deviantART: Ane of the biggest communities for designers and digital artists, deviantART has some Photoshop pattern libraries that you can view under the Photoshop Patterns category.
- Brusheezy: Brusheezy, a site featuring top-notch Photoshop resources, has a section that presents Photoshop patterns that you can sort and filter.
- The Ultimate Collection Of Free Photoshop Patterns: This post on Smashing Magazine (past Blueprint Instruct correspondent Steven Snell) is loaded with links to free Photoshop patterns around the web.
Creating a Blueprint Library
As previously stated, a pattern library is a ready of Photoshop patterns. It's a proficient idea to create Photoshop pattern libraries for when you would like to go on your custom patterns organized or when you lot desire to share your patterns with others. To create a pattern library, open up the Preset Managing director (Edit > Preset Manager).
Filter the presets so that only Patterns are showing. Select the patterns you want to be included in the pattern library that you will be making by belongings down Ctrl/Cmd and clicking on each of them. One time yous have selected all the patterns yous want to include, click on the Relieve Set up push.
Salve the blueprint file anywhere in your reckoner. 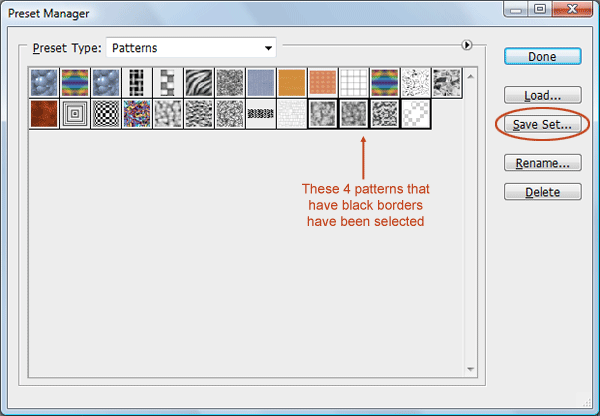 This file can now exist shared and installed on other computers.
Tutorials That Utilize Photoshop Patterns
By now, yous should be intimately familiar with Photoshop patterns. To conclude this guide and to inspire you to experiment and contain Photoshop patterns into your blueprint projects, here are some Photoshop tutorials that involve the use of Photoshop patterns. Create a Scene with Retrofuturistic-Inspired Low-cal Effects 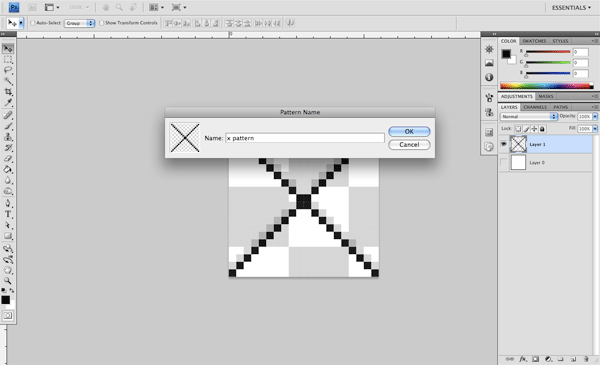 How to Describe a Realistic Mobile Phone with Photoshop
 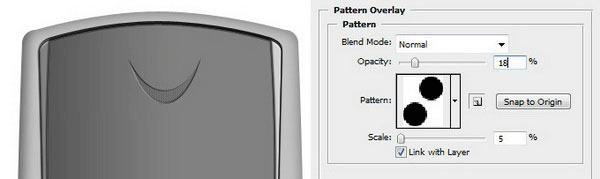 Create a Make clean and Classy Spider web Pattern in Photoshop
 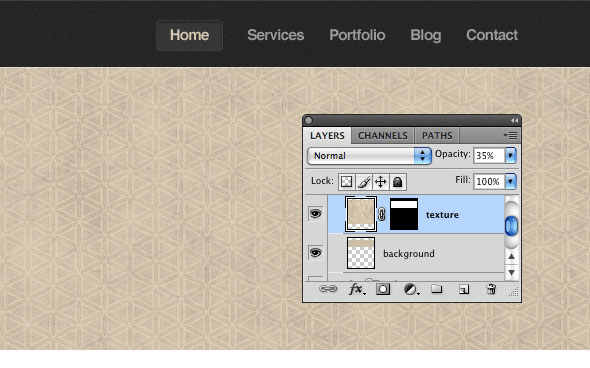 Make a Stylish Futuristic Textured Wallpaper in Photoshop
Source: https://www.webfx.com/blog/web-design/photoshop-patterns-ultimate-guide/
Posted by: johnsonfrony1967.blogspot.com
0 Response to "Where Are Defined Patterns Saved In Photoshop"
Post a Comment